Mantis 10 Single Drive 48V 800W Wiring Diagram Guide SGTEC07

Mantis 10 Single Drive 48V 800W Wiring Diagram Guide SGTEC07

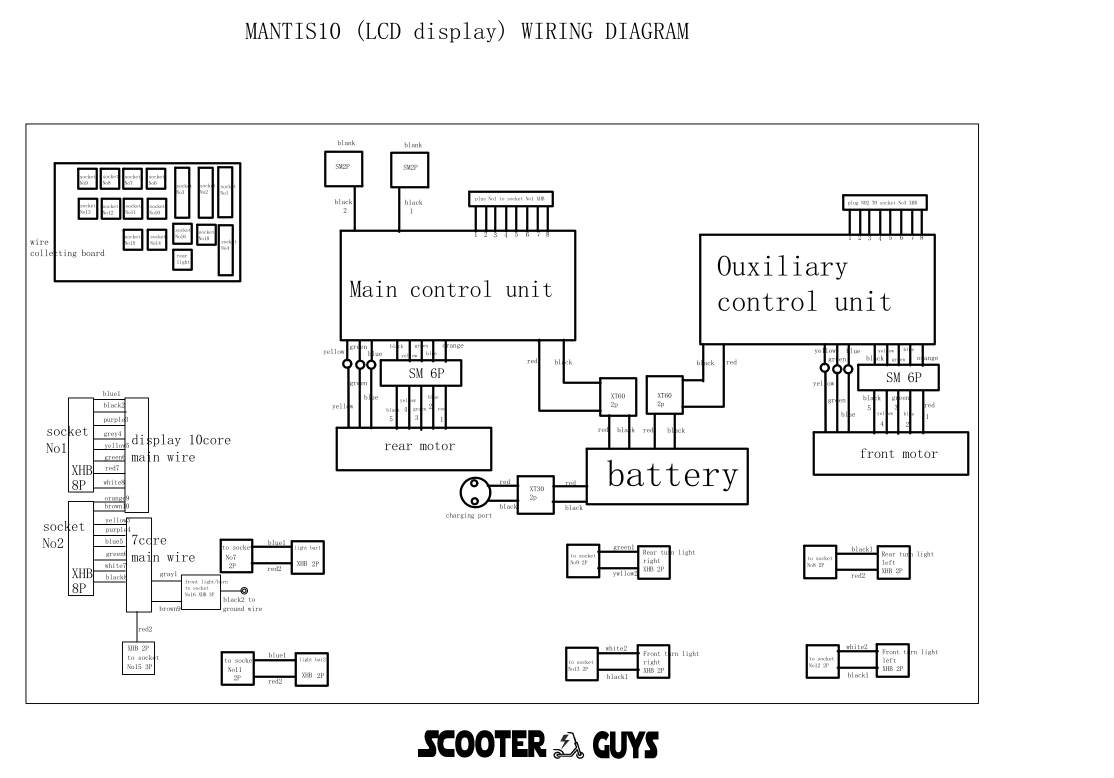
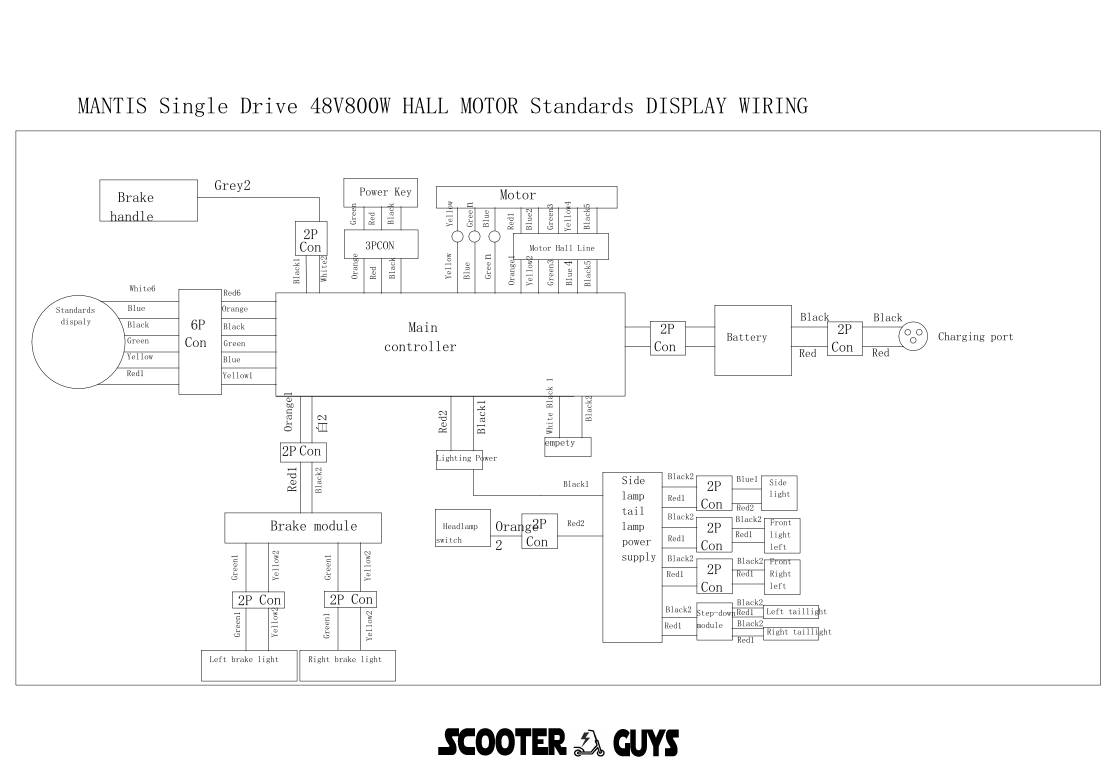
This guide provides a comprehensive wiring diagram for the Mantis 10 electric scooter with a single drive 48V 800W brushless motor with a hall sensor. The wiring involves the standard display, main controller, various connectors, brake module, brake handle, headlamp, power key, 48V battery, and charge port.

Components:

  1. Standard Display:
    • Connection Type: 6-pin connector (6P)
  2. Main Controller:
    • Function: Central processing unit for controlling the scooter
  3. Motor:
    • Model: 800W Brushless Motor with Hall Sensor
    • Voltage: 48V
  4. Brake Module:
    • Connection Type: 2-pin connector (2P)
  5. Brake Handle:
    • Connection Type: 2-pin connector (2P)
  6. Headlamp:
    • Connection Type: 2-pin connector (2P)
  7. Power Key:
    • Connection Type: 3-pin connector (3P)
  8. 48V Battery:
    • Connection Type: 2-pin connector (2P)
  9. Charge Port:
    • Connection Type: 2-pin connector (2P)
  10. Motor Hall Line:
  • Connection Type: Hall sensor line

Wiring Diagram:

Below is a detailed step-by-step guide to wiring each component:

  1. Connecting the Standard Display to the Main Controller:
    • The standard display uses a 6-pin connector (6P).
    • Wire color coding and pin configuration:
      • Red (Power +5V): Connect to the +5V power output on the main controller.
      • Black (Ground): Connect to the ground terminal on the main controller.
      • Green (Signal 1): Connect to the first signal input on the main controller.
      • Yellow (Signal 2): Connect to the second signal input on the main controller.
      • Blue (Communication): Connect to the data communication port on the main controller.
      • White (Backlight Control): Connect to the backlight control input on the main controller.
  2. Connecting the Brake Module to the Main Controller:
    • The brake module uses a 2-pin connector (2P).
    • Wire color coding and pin configuration:
      • Red (Power +5V): Connect to the +5V power output on the main controller.
      • Black (Ground): Connect to the ground terminal on the main controller.
  3. Connecting the Brake Handle to the Main Controller:
    • The brake handle uses a 2-pin connector (2P).
    • Wire color coding and pin configuration:
      • Red (Brake Signal): Connect to the brake signal input on the main controller.
      • Black (Ground): Connect to the ground terminal on the main controller.
  4. Connecting the Headlamp to the Main Controller:
    • The headlamp uses a 2-pin connector (2P).
    • Wire color coding and pin configuration:
      • Red (Power +): Connect to the headlamp power output on the main controller.
      • Black (Ground): Connect to the ground terminal on the main controller.
  5. Connecting the Power Key to the Main Controller:
    • The power key uses a 3-pin connector (3P).
    • Wire color coding and pin configuration:
      • Red (Power +): Connect to the main power input on the main controller.
      • Black (Ground): Connect to the ground terminal on the main controller.
      • Green (Signal): Connect to the power key signal input on the main controller.
  6. Connecting the 48V Battery to the Main Controller:
    • The 48V battery uses a 2-pin connector (2P).
    • Wire color coding and pin configuration:
      • Red (Battery +): Connect to the battery positive terminal on the main controller.
      • Black (Battery -): Connect to the ground terminal on the main controller.
  7. Connecting the Charge Port to the Main Controller:
    • The charge port uses a 2-pin connector (2P).
    • Wire color coding and pin configuration:
      • Red (Charging +): Connect to the charging positive terminal on the main controller.
      • Black (Charging -): Connect to the ground terminal on the main controller.
  8. Connecting the Motor Hall Line to the Main Controller:
    • The motor hall line connects the hall sensors of the motor to the main controller.
    • Hall sensor connection details:
      • Red (Hall Power +5V): Connect to the +5V hall sensor power output on the main controller.
      • Black (Ground): Connect to the hall sensor ground terminal on the main controller.
      • Green (Hall Sensor A): Connect to the hall sensor A input on the main controller.
      • Yellow (Hall Sensor B): Connect to the hall sensor B input on the main controller.
      • Blue (Hall Sensor C): Connect to the hall sensor C input on the main controller.

Wiring Connections:

  1. Standard Display to Main Controller (6P):
    • Red: +5V Power
    • Black: Ground
    • Green: Signal 1
    • Yellow: Signal 2
    • Blue: Communication
    • White: Backlight Control
  2. Brake Module to Main Controller (2P):
    • Red: +5V Power
    • Black: Ground
  3. Brake Handle to Main Controller (2P):
    • Red: Brake Signal
    • Black: Ground
  4. Headlamp to Main Controller (2P):
    • Red: Power +
    • Black: Ground
  5. Power Key to Main Controller (3P):
    • Red: Power +
    • Black: Ground
    • Green: Signal
  6. 48V Battery to Main Controller (2P):
    • Red: Battery +
    • Black: Battery –
  7. Charge Port to Main Controller (2P):
    • Red: Charging +
    • Black: Charging –
  8. Motor Hall Line to Main Controller:
    • Red: +5V Power
    • Black: Ground
    • Green: Hall Sensor A
    • Yellow: Hall Sensor B
    • Blue: Hall Sensor C

Tips:

  • Ensure all connections are secure and insulated to prevent short circuits.
  • Follow the color-coding strictly to avoid any miswiring.
  • Refer to the user manual for specific details regarding your model.
  • Double-check all connections before powering on the scooter to ensure everything is correctly wired.

This detailed wiring diagram and guide should help in successfully connecting and configuring the components of your Mantis 10 electric scooter with a single drive 48V 800W motor.

Read more

Mantis 10 Electric Scooter Wiring Diagram Guide SGTEC06

Mantis 10 Electric Scooter Wiring Diagram Guide SGTEC06

This guide provides a detailed wiring diagram for the Mantis 10 electric scooter, focusing on connecting the LCD display, Hub Board SG134, main control unit, auxiliary control unit, 10-core and 7-core main wires, and the motor.

Components:

  1. LCD Display:
    • Model: Generic Mantis 10 Display
    • Connection Type: 10-core wire
  2. Hub Board SG134:
    • Functions: Distribution of signals and power to various components
  3. Main Control Unit (MCU):
    • Function: Central processing unit for controlling the scooter
  4. Auxiliary Control Unit (ACU):
    • Function: Assists the MCU with additional control features
  5. 10-Core Main Wire SG790B:
    • Connection: Between the display and MCU
  6. 7-Core Main Wire SG790A:
    • Connection: Between the hub board and MCU
  7. Motor:
    • Model: 10-inch 60V 1100W SG798B
    • Connection: Wired to the MCU via hub board

Wiring Diagram:

Below is a step-by-step guide to wiring each component:

  1. Connecting the LCD Display to the Main Control Unit:
    • The LCD display uses a 10-core main wire (SG790B).
    • Wire color coding and pin configuration:
      • Red (Power): Connect to the 60V positive terminal.
      • Black (Ground): Connect to the ground terminal.
      • Green (Signal): Connect to the MCU’s signal input.
      • Yellow (Throttle Signal): Connect to the throttle control input on the MCU.
      • Blue (Brake Signal): Connect to the brake input on the MCU.
      • White (Speed Sensor): Connect to the speed sensor input on the MCU.
      • Brown (Auxiliary Power): Connect to the auxiliary power input on the MCU.
      • Purple (Light Control): Connect to the light control input on the MCU.
      • Orange (Communication): Connect to the data communication port on the MCU.
      • Gray (Other Signal): Connect as required for additional functions.
  2. Connecting the Hub Board SG134 to the Main Control Unit:
    • The hub board connects to the MCU via the 7-core main wire (SG790A).
    • Wire color coding and pin configuration:
      • Red (Power): Connect to the 60V positive terminal.
      • Black (Ground): Connect to the ground terminal.
      • Green (Signal): Connect to the hub board signal input.
      • Yellow (Throttle Signal): Connect to the throttle control input on the hub board.
      • Blue (Brake Signal): Connect to the brake input on the hub board.
      • White (Speed Sensor): Connect to the speed sensor input on the hub board.
      • Brown (Auxiliary Power): Connect to the auxiliary power input on the hub board.
  3. Connecting the Motor to the Main Control Unit via Hub Board:
    • The motor (SG798B) connects to the hub board which then connects to the MCU.
    • Motor connection details:
      • Red (Motor Power +): Connect to the motor power output on the hub board.
      • Black (Motor Power -): Connect to the ground terminal on the hub board.
      • Green (Hall Sensor A): Connect to the corresponding hall sensor input on the hub board.
      • Yellow (Hall Sensor B): Connect to the corresponding hall sensor input on the hub board.
      • Blue (Hall Sensor C): Connect to the corresponding hall sensor input on the hub board.
      • White (Temperature Sensor): Connect to the temperature sensor input on the hub board.
      • Brown (Other Signal): Connect as required for additional motor functions.
  4. Auxiliary Control Unit (ACU):
    • The ACU assists with additional control features and connects to the MCU and hub board as necessary.
    • Ensure all signal and power lines from the ACU are appropriately connected to the MCU and hub board.

Tips:

  • Ensure all connections are secure and insulated to prevent short circuits.
  • Follow the color-coding strictly to avoid any miswiring.
  • Refer to the user manual for specific details regarding your model.

This detailed wiring diagram and guide should help in successfully connecting and configuring the components of your Mantis 10 electric scooter.


Read more

Safe Use Of Lithium Ion Battery For Ebikes And Escooters

Safe Use of Lithium Ion Battery For Ebikes And Escooters


Using lithium-ion batteries for e-bikes and e-scooters. As the popularity of these electric modes of transport grows, it’s important to address the fire safety concerns associated with their charging and storage.

Just like the batteries in our mobile phones, e-bikes and e-scooters rely on lithium-ion technology for power. However, if these batteries and their chargers are of substandard quality, damaged, or misused, there’s a risk of overheating. This can lead to intense fires, releasing toxic gases and smoke with very little warning.

In a recent investigation conducted by the consumer safety charity Electrical Safety First, nearly 60 listings on popular online marketplaces were found to contain highly dangerous e-bike chargers that didn’t meet UK safety standards. This highlights the importance of ensuring the safety of our charging practices.

To help protect yourself and others from the dangers of e-bike, e-scooter, or lithium-ion fires, please follow these safety guidelines:

Charging:
– Whenever possible, avoid charging your e-bikes and e-scooters indoors.
– Do not store or charge them in communal areas, as this can hinder people’s ability to escape in case of an emergency.
– Charge your batteries while you are awake and alert, and avoid charging them when you are away from home.
– Keep a safe distance from combustible or flammable materials while charging.
– Make sure your smoke alarms are working properly. If you charge or store your e-bike or e-scooter in a garage or kitchen, consider installing heat alarms for better detection.
– Always use the manufacturer-approved charger and carefully follow the instructions.
– Remember to unplug the charger once you’re done using it.
– Regularly check your battery for any signs of damage.
– Avoid covering chargers or battery packs during charging, as it may lead to overheating and fire hazards.
– Never overcharge your battery. Refer to the instructions for recommended charge times.

In the event of an e-bike, e-scooter, or lithium-ion battery fire, do not attempt to extinguish it yourself. Instead, prioritize your own safety by getting out and staying out, then call emergency services right away.

Stay safe and enjoy your rides with peace of mind!

Read more

Surron Light bee x V Ultra bee

Are you torn between the Surron LBX and the Ultra Bee? Well, let me break it down for you.

If you prefer a lightweight trail bike, the Surron LBX could be your go-to choice. Weighing in at 47kg, it offers excellent maneuverability and is easy to transport. Plus, it’s ideal for motor homes and camper vans due to its compact size. With speeds of up to 45mph, it’s perfect for those who enjoy off-road adventures.

On the other hand, if you want a more powerful machine catering to dirt riders, the Surron Ultra Bee might be the one for you. With a weight of 88kg, it’s heavier but packs a punch. With a top speed of 55mph, it’s suitable for motocross tracks or serious trails. The Ultra Bee also boasts double the peak power of the LBX, thanks to its 12.5KW capacity.

Battery-wise, the Ultra Bee relies on a 74v 55Ah battery, while the LBX uses a 60v 40AH battery. Both have a charging time of approximately 4 hours. Surron claims a range of 85 miles for the Ultra Bee and 60 miles for the LBX.

When it comes to suspension and brakes, the Ultra Bee takes the lead. It features fully adjustable forks and shocks with 9.4 inches of travel, providing a comfortable ride. Moreover, it boasts full-size dirt bike brakes and a lightweight breaking system, offering superior performance compared to the LBX.

In terms of rider preferences, the Ultra Bee caters to taller riders with a seat height of 35.8 inches. It also includes a full-size seat, fenders, hand guards, and a robust skid plate. Additionally, it offers traction control and regenerative settings, allowing riders to customize their experience on the go.

As for pricing, the Ultra Bee ranges from £6,299 for the Off-Road version to £6,699 for Road Legal. The Light Bee, on the other hand, starts at £4,695 for the Off-Road model and £4,995 for Road Legal.

Both models are available for test rides and currently in stock. So, take your pick and get ready for an exhilarating ride!

Read more

Importance of Wearing Safety Gear Whilst Riding On Your Ebike Escooter

Importance of Wearing Safety Gear Whilst Riding On Your Ebike, Escooter

Introduction.

In today’s fast-paced world, the popularity of electric bikes (ebikes) and electric scooters (escooters) has skyrocketed. These convenient modes of transportation have become a common sight on city streets, providing a cost-effective and eco-friendly alternative to traditional vehicles. However, with the rise in their usage comes the pressing need to address safety concerns for both riders and pedestrians. This essay aims to assertively explore the importance of wearing safety gear while riding an ebike or escooter and its significant impact on pedestrian safety.

Firstly, it is crucial to emphasize the significance of protective equipment for safe riding. Ebikes and escooters can reach considerable speeds, exposing riders to potential accidents and injuries. Wearing appropriate safety gear such as helmets, knee pads, elbow guards, and reflective clothing greatly reduces the risk of severe harm during collisions or falls. By acknowledging this subtopic, riders can better understand that investing in protective equipment is not only wise but also essential for their personal well-being.

Furthermore, this article highlights the direct impact that wearing safety gear has on pedestrian safety. Pedestrians share sidewalks and crosswalks with ebike and escooter users daily. Without proper protective gear, riders pose a higher threat to themselves as well as those around them. In case of an accident involving pedestrians, wearing helmets significantly reduces head injuries while reflective clothing enhances visibility during low-light conditions.

In conclusion, prioritizing rider safety by enforcing the use of safety gear is paramount in promoting a harmonious coexistence between ebike or escooter riders and pedestrians. By understanding that wearing protective equipment ensures personal well-being as well as safeguarding others’ lives, individuals can contribute to creating a safer environment for all road users.

Protective Equipment For Safe Riding.

When it comes to riding an eBike or eScooter, wearing protective equipment is of utmost importance. Not only does it safeguard the riders themselves, but it also ensures the safety of pedestrians who share the road with them. The use of safety gear such as helmets, knee pads, and elbow pads is essential in preventing severe injuries and even fatalities. By contrast, those who neglect to wear proper protective gear put themselves at a higher risk of accidents and increase the potential harm they may cause to others.

One cannot stress enough the significance of wearing a helmet while riding an eBike or eScooter. Helmets serve as a shield for our most vital organ – our brain. In case of an unforeseen collision or fall, a helmet can reduce the impact on our head and minimize the chances of traumatic brain injuries. Without this crucial piece of protective equipment, riders expose themselves to life-altering consequences that may lead to permanent disabilities or worse. Moreover, by not wearing helmets, riders set a reckless example for other users on the road and undermine public safety.

In addition to helmets, knee pads and elbow pads are equally important in ensuring safe riding experiences. These protective gears act as a barrier between our skin and any potential abrasions caused by accidents or falls. They provide cushioning when we hit hard surfaces unexpectedly, reducing the risk of fractures or deep wounds that could require extensive medical attention. Furthermore, knee pads and elbow pads help maintain stability during rides by providing additional support to these vulnerable joints.

Impact On Pedestrian Safety.

Wearing safety gear while riding on your eBike or eScooter is of utmost importance as it significantly impacts pedestrian safety. The assertive tone is necessary to emphasize the gravity of this issue and highlight the potential consequences of neglecting safety precautions. Picture this: a bustling city street filled with pedestrians going about their daily routines, unaware of the imminent danger lurking in their midst. Suddenly, a rider zooms past them on an eBike or eScooter, completely disregarding their presence and failing to wear any protective gear. The pedestrians are left vulnerable and exposed to potential accidents that could have been easily prevented.

Without safety gear, riders compromise not only their own well-being but also endanger the lives of innocent pedestrians. In the event of an accident, a rider without proper protection increases the risk of sustaining severe injuries that may impair their ability to control their vehicle effectively. As a result, they become more likely to collide with unsuspecting pedestrians who bear no responsibility for such recklessness. Imagine being one of those pedestrians caught off guard by an out-of-control rider; fear and panic would undoubtedly ensue as they scramble for safety amidst the chaos.

Furthermore, wearing safety gear serves as a visual cue for both riders and pedestrians alike, enhancing awareness on the road and promoting responsible behavior. When individuals witness others taking precautions by donning helmets, reflective clothing, or elbow pads, it sends a powerful message about prioritizing safety over convenience or style. By setting this example through assertive action rather than passive words alone, riders contribute to creating a culture where everyone understands that pedestrian safety should never be compromised.

Conclusion.

In conclusion, it is absolutely imperative to wear safety gear while riding on your e-bike or e-scooter and prioritize the safety of pedestrians. The use of protective equipment is crucial to ensure a safe riding experience for both riders and pedestrians.

Firstly, wearing safety gear such as helmets, knee pads, and elbow pads provides essential protection in case of accidents or collisions. These protective measures can significantly reduce the risk of head injuries, fractures, and abrasions that may occur during an accident. By taking this precautionary step, riders demonstrate their commitment to personal safety and responsible riding.

Moreover, prioritizing pedestrian safety is equally important. E-bikes and e-scooters have become increasingly popular modes of transportation in urban areas, often sharing the same spaces with pedestrians. The impact on pedestrian safety cannot be understated. Riders must be vigilant at all times and practice defensive riding techniques to avoid accidents or collisions with pedestrians. This includes adhering to speed limits, yielding when necessary, and maintaining a safe distance from walkers.

By wearing proper safety gear while riding on an e-bike or e-scooter and safeguarding pedestrians’ well-being, we contribute to creating a safer environment for everyone involved. It is our responsibility as riders to acknowledge the potential risks associated with these modes of transport and take proactive measures to mitigate them.

In conclusion, there should be no compromise when it comes to wearing safety gear while riding on your e-bike or e-scooter. Additionally, prioritizing pedestrian safety should always remain at the forefront of every rider’s mind. By doing so assertively, we can ensure a harmonious coexistence between riders and pedestrians while enjoying the benefits these innovative modes of transportation offer us.

https://scooterguys.co.uk

Read more

Essential Escooter and E-bike Accessories from Scooter Guys

Essential Escooter and E-bike Accessories from Scooter Guys

Electric scooters are becoming increasingly popular in the UK, and an essential mode of transport for commuting, with their rise in popularity comes a demand for accessories to enhance the riding experience. There are a variety of accessories available on the market, but some stand out as the best.

HELMETS

a helmet is an essential accessory for any electric scooter rider. Safety should always be a top priority, and wearing a helmet can prevent serious head injuries in case of an accident. All scooter guys helmets are check with the following regulations

  • British Standard BS 6658:1985 and carry the BSI Kitemark
  • UNECE Regulation 22.05
  • A European Economic Area member standard offering at least the same safety and protection as BS 6658:1985, and carry a mark equivalent to the BSI Kitemark

PHONE MOUNT

, a phone mount is another useful accessory. Scooter guys has a range of phone mounts, which have been tested in the roughest terrain and wet weather, the phone mounts are ideal for GPS navigation and music streaming apps readily available on smartphones, having your phone mounted on your escooter’s handlebars makes it easier to access these features while riding.

LIGHTS

lights and reflectors are important accessories for night-time riding. They increase visibility and make it easier for other road users to see you, scooter guys have in stock latest powerful CRE LED chip headlights, with they powerful beam, lights up darkest of trail.

STORAGE

storage options such as baskets or bags can be useful for carrying items such as spare battery pack or phones while riding.

Overall, these accessories can greatly improve the safety and convenience of electric scooter riding in the UK

https://scooterguys.co.uk/products/

https://www.ruroc.com/en_gb/motorcycle/motorcycle-helmets.html

Read more

Xiaomi Pro Escooter: A Popular Choice for Efficient Transportation

Discover the Xiaomi Pro Escooter, a popular and efficient transportation choice. With its expanded display, 10 inch tyres, and large capacity battery, this escooter offers increased range, ride comfort, and ease of use. Plus, with its Kinetic Energy Recovery System (KERS), it’s an eco-friendly option for the future.

Read more

frequently asked questions

How to Choose the Right Scooter

To choose the right scooter for your needs, factors such as intended use, budget, and personal preferences should be considered. It should be determined whether the scooter will be used primarily for commuting, recreational purposes, or both. The scooter’s engine power, size, weight, and fuel efficiency should be taken into account. A lightweight or foldable model might be preferred for convenience and easy maneuverability. Different brands and models should be researched, reviews read, and scooters test ridden if possible to make an informed decision.

Safety Gear for Scooter Riding

When riding a scooter, safety should be prioritized. A properly fitting helmet that meets safety standards should be worn to protect the head in case of accidents. Protective clothing such as long sleeves, long pants, and closed-toe shoes should also be worn to shield the body from potential injuries. Gloves can provide better grip and protect the hands. If riding at night or in low visibility conditions, reflective clothing or accessories should be worn or added to make oneself more visible to others on the road.

Maintaining and Servicing a Scooter

Regular maintenance is crucial for optimal performance and longevity of a scooter. The manufacturer’s guidelines regarding maintenance intervals and tasks should be followed. Common maintenance tasks include checking and maintaining proper tire pressure, changing the engine oil, inspecting and cleaning the air filter, and lubricating moving parts. The scooter should be kept clean and components like brakes, lights, and cables periodically inspected for wear or damage. If not confident in one’s abilities, a professional mechanic should be consulted or the scooter taken to an authorized service center for regular servicing.

Driver’s License Requirement for Scooter Riding

The requirement for a driver’s license to ride a scooter depends on the specific laws and regulations of one’s country or region. In many places, a valid driver’s license or a specific license class may be needed to legally operate a scooter on public roads. The local Department of Motor Vehicles or transportation authority should be checked with to understand the requirements in one’s area.

Advantages of Electric Scooters over Gas-Powered Scooters

Using an electric scooter offers several advantages over a gas-powered scooter. Electric scooters are more environmentally friendly as they produce zero emissions during operation. They are generally quieter and require less maintenance since they have fewer moving parts and no need for engine oil changes. Electric scooters can also be more cost-effective in terms of fuel expenses, especially if affordable electricity for charging is available. However, electric scooters may have limitations in terms of range and charging infrastructure compared to gas-powered scooters.

Range of an Electric Scooter on a Single Charge

The range of an electric scooter on a single charge varies depending on factors such as battery capacity, scooter weight, riding style, terrain, and weather conditions. Generally, electric scooters can travel between 10 to 50 miles (16 to 80 kilometers) on a single charge. The specifications provided by the manufacturer for the specific model being considered should be checked, as the range can vary significantly.

Average Speed of a Typical Scooter

The average speed of a typical scooter depends on various factors, including engine size, scooter design, and local regulations. Generally, scooters designed for urban commuting tend to have lower average speeds ranging from 25 to 45 miles per hour (40 to 72 kilometers per hour). However, larger scooters or those designed for higher performance can reach speeds of 60 miles per hour (96 kilometers per hour) or more. Speed limits and regulations in one’s area should be adhered to and the scooter operated safely.

Read more

e-scooter-tyre-fitting-guide

How to Fit a Pneumatic E-Scooter Tire: A Step-by-Step Guide

Fitting an e-scooter tire can seem like a daunting task, but with the right tools and some basic knowledge, it’s a straightforward process. In this guide, we’ll walk you through the steps to fit a pneumatic e-scooter tire.

What You’ll Need

Before you begin, make sure you have the following tools on hand:

– Tire lever
– Pump
– Allen wrench
– Screwdriver (depending on your e-scooter model)

1: Prepare the E-Scooter

If your e-scooter has a removable battery, make sure it is disconnected before starting. Place the scooter on a stable surface and secure it to prevent it from tipping over.

2: Remove the Old Tire

Use a tire lever to carefully pry one side of the tire away from the rim. Once you’ve lifted one side, work your way around the tire, gradually releasing it from the rim. Be cautious not to damage the inner tube if your scooter uses one.

3: Inspect the Rim and Inner Tube

While the tire is off, check the rim for any sharp edges or debris that could cause punctures. Inspect the inner tube for damage or wear. If necessary, replace the inner tube as well.

4: Install the New Tire

Start by inserting one side of the new tire onto the rim, making sure it fits evenly. Using your hands, work your way around the tire, pushing the remaining portion onto the rim. Avoid using tire levers during this step, as they may damage the tire or inner tube.

5: Inflate the Tire

Using a pump, gradually inflate the tire to the recommended pressure indicated on the sidewall of the tire. Ensure that the tire is evenly seated on the rim and that it doesn’t bulge or have any visible wrinkles.

6: Check for Proper Alignment

Spin the wheel gently and visually inspect the tire to ensure it rotates smoothly without wobbling or rubbing against any part of the e-scooter. Adjust the tire if necessary.

7: Reattach the Battery (if applicable)

If you had to remove the battery, reattach it securely according to your e-scooter’s instructions.

Always refer to your e-scooter’s user manual for specific instructions and safety precautions, as different models may have unique requirements for tire fitting. If you’re uncertain about any step, it’s recommended to consult a professional or contact the manufacturer for assistance.

With these steps in mind, you’ll be able to fit a pneumatic e-scooter tire with confidence.

Read more

E-scooter and E-bike Spare Parts

Read more