Mantis 10 Single Drive 48V 800W Wiring Diagram Guide SGTEC07

Mantis 10 Single Drive 48V 800W Wiring Diagram Guide SGTEC07

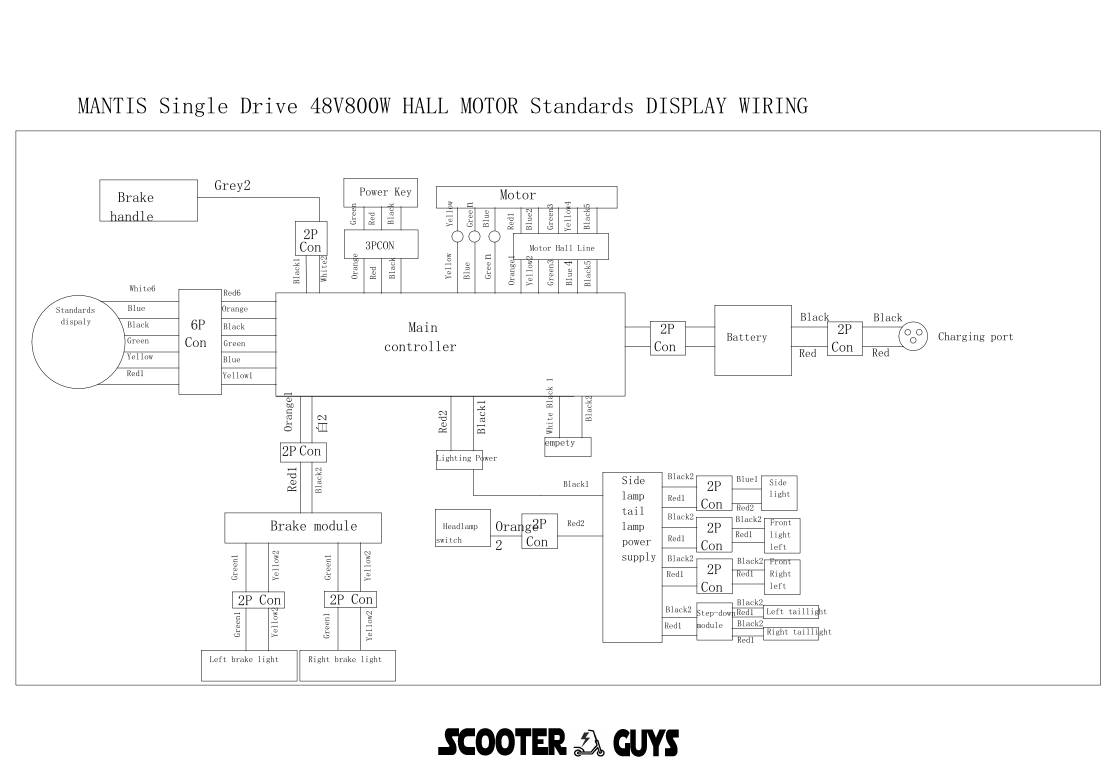
This guide provides a comprehensive wiring diagram for the Mantis 10 electric scooter with a single drive 48V 800W brushless motor with a hall sensor. The wiring involves the standard display, main controller, various connectors, brake module, brake handle, headlamp, power key, 48V battery, and charge port.

Components:

  1. Standard Display:
    • Connection Type: 6-pin connector (6P)
  2. Main Controller:
    • Function: Central processing unit for controlling the scooter
  3. Motor:
    • Model: 800W Brushless Motor with Hall Sensor
    • Voltage: 48V
  4. Brake Module:
    • Connection Type: 2-pin connector (2P)
  5. Brake Handle:
    • Connection Type: 2-pin connector (2P)
  6. Headlamp:
    • Connection Type: 2-pin connector (2P)
  7. Power Key:
    • Connection Type: 3-pin connector (3P)
  8. 48V Battery:
    • Connection Type: 2-pin connector (2P)
  9. Charge Port:
    • Connection Type: 2-pin connector (2P)
  10. Motor Hall Line:
  • Connection Type: Hall sensor line

Wiring Diagram:

Below is a detailed step-by-step guide to wiring each component:

  1. Connecting the Standard Display to the Main Controller:
    • The standard display uses a 6-pin connector (6P).
    • Wire color coding and pin configuration:
      • Red (Power +5V): Connect to the +5V power output on the main controller.
      • Black (Ground): Connect to the ground terminal on the main controller.
      • Green (Signal 1): Connect to the first signal input on the main controller.
      • Yellow (Signal 2): Connect to the second signal input on the main controller.
      • Blue (Communication): Connect to the data communication port on the main controller.
      • White (Backlight Control): Connect to the backlight control input on the main controller.
  2. Connecting the Brake Module to the Main Controller:
    • The brake module uses a 2-pin connector (2P).
    • Wire color coding and pin configuration:
      • Red (Power +5V): Connect to the +5V power output on the main controller.
      • Black (Ground): Connect to the ground terminal on the main controller.
  3. Connecting the Brake Handle to the Main Controller:
    • The brake handle uses a 2-pin connector (2P).
    • Wire color coding and pin configuration:
      • Red (Brake Signal): Connect to the brake signal input on the main controller.
      • Black (Ground): Connect to the ground terminal on the main controller.
  4. Connecting the Headlamp to the Main Controller:
    • The headlamp uses a 2-pin connector (2P).
    • Wire color coding and pin configuration:
      • Red (Power +): Connect to the headlamp power output on the main controller.
      • Black (Ground): Connect to the ground terminal on the main controller.
  5. Connecting the Power Key to the Main Controller:
    • The power key uses a 3-pin connector (3P).
    • Wire color coding and pin configuration:
      • Red (Power +): Connect to the main power input on the main controller.
      • Black (Ground): Connect to the ground terminal on the main controller.
      • Green (Signal): Connect to the power key signal input on the main controller.
  6. Connecting the 48V Battery to the Main Controller:
    • The 48V battery uses a 2-pin connector (2P).
    • Wire color coding and pin configuration:
      • Red (Battery +): Connect to the battery positive terminal on the main controller.
      • Black (Battery -): Connect to the ground terminal on the main controller.
  7. Connecting the Charge Port to the Main Controller:
    • The charge port uses a 2-pin connector (2P).
    • Wire color coding and pin configuration:
      • Red (Charging +): Connect to the charging positive terminal on the main controller.
      • Black (Charging -): Connect to the ground terminal on the main controller.
  8. Connecting the Motor Hall Line to the Main Controller:
    • The motor hall line connects the hall sensors of the motor to the main controller.
    • Hall sensor connection details:
      • Red (Hall Power +5V): Connect to the +5V hall sensor power output on the main controller.
      • Black (Ground): Connect to the hall sensor ground terminal on the main controller.
      • Green (Hall Sensor A): Connect to the hall sensor A input on the main controller.
      • Yellow (Hall Sensor B): Connect to the hall sensor B input on the main controller.
      • Blue (Hall Sensor C): Connect to the hall sensor C input on the main controller.

Wiring Connections:

  1. Standard Display to Main Controller (6P):
    • Red: +5V Power
    • Black: Ground
    • Green: Signal 1
    • Yellow: Signal 2
    • Blue: Communication
    • White: Backlight Control
  2. Brake Module to Main Controller (2P):
    • Red: +5V Power
    • Black: Ground
  3. Brake Handle to Main Controller (2P):
    • Red: Brake Signal
    • Black: Ground
  4. Headlamp to Main Controller (2P):
    • Red: Power +
    • Black: Ground
  5. Power Key to Main Controller (3P):
    • Red: Power +
    • Black: Ground
    • Green: Signal
  6. 48V Battery to Main Controller (2P):
    • Red: Battery +
    • Black: Battery –
  7. Charge Port to Main Controller (2P):
    • Red: Charging +
    • Black: Charging –
  8. Motor Hall Line to Main Controller:
    • Red: +5V Power
    • Black: Ground
    • Green: Hall Sensor A
    • Yellow: Hall Sensor B
    • Blue: Hall Sensor C

Tips:

  • Ensure all connections are secure and insulated to prevent short circuits.
  • Follow the color-coding strictly to avoid any miswiring.
  • Refer to the user manual for specific details regarding your model.
  • Double-check all connections before powering on the scooter to ensure everything is correctly wired.

This detailed wiring diagram and guide should help in successfully connecting and configuring the components of your Mantis 10 electric scooter with a single drive 48V 800W motor.

Read more

e-scooter-tyre-fitting-guide

How to Fit a Pneumatic E-Scooter Tire: A Step-by-Step Guide

Fitting an e-scooter tire can seem like a daunting task, but with the right tools and some basic knowledge, it’s a straightforward process. In this guide, we’ll walk you through the steps to fit a pneumatic e-scooter tire.

What You’ll Need

Before you begin, make sure you have the following tools on hand:

– Tire lever
– Pump
– Allen wrench
– Screwdriver (depending on your e-scooter model)

1: Prepare the E-Scooter

If your e-scooter has a removable battery, make sure it is disconnected before starting. Place the scooter on a stable surface and secure it to prevent it from tipping over.

2: Remove the Old Tire

Use a tire lever to carefully pry one side of the tire away from the rim. Once you’ve lifted one side, work your way around the tire, gradually releasing it from the rim. Be cautious not to damage the inner tube if your scooter uses one.

3: Inspect the Rim and Inner Tube

While the tire is off, check the rim for any sharp edges or debris that could cause punctures. Inspect the inner tube for damage or wear. If necessary, replace the inner tube as well.

4: Install the New Tire

Start by inserting one side of the new tire onto the rim, making sure it fits evenly. Using your hands, work your way around the tire, pushing the remaining portion onto the rim. Avoid using tire levers during this step, as they may damage the tire or inner tube.

5: Inflate the Tire

Using a pump, gradually inflate the tire to the recommended pressure indicated on the sidewall of the tire. Ensure that the tire is evenly seated on the rim and that it doesn’t bulge or have any visible wrinkles.

6: Check for Proper Alignment

Spin the wheel gently and visually inspect the tire to ensure it rotates smoothly without wobbling or rubbing against any part of the e-scooter. Adjust the tire if necessary.

7: Reattach the Battery (if applicable)

If you had to remove the battery, reattach it securely according to your e-scooter’s instructions.

Always refer to your e-scooter’s user manual for specific instructions and safety precautions, as different models may have unique requirements for tire fitting. If you’re uncertain about any step, it’s recommended to consult a professional or contact the manufacturer for assistance.

With these steps in mind, you’ll be able to fit a pneumatic e-scooter tire with confidence.

Read more

Where Can I Get an Electric Scooter Repair

Where Can I Get an Electric Scooter Repair

Electric and mechanical devices cannot run without proper maintenance and might also need repairs sometimes. Eventually, some malfunction will happen, and you will need to repair your scooter. But the question still stands, where can I get an electric scooter repair near me? In this article we will describe where you can get your electric scooter repaired.

If not, look for the nearest shop and take it in for repair. But it would be advisable to keep your scooter clean, to charge it regularly, and to store it in an enclosed space that is not cold so that the battery lasts as long as possible. Don’t go wild with your scooter, do not ride it on the grass, and avoid water to protect the components from moisture.

Electric Scooter Repair

If you have an old electric scooter, there are bound to be some breakdowns and malfunctions. That is when you know you need to get your electric scooter repaired. If your electric scooter breaks down and needs repair, the best, safest, and cheapest way is to check if you have a warranty and send it to scooter guys service shop in Bradford, London.

Here are some of the main options that you have:

  • Scooter guys service shops
  • Repair from distributor
  • Repair Shops
  • Maintenance site

Scooter Guys Service Shop

We at scooter guys provide our customers with the best and most reliable service. Even though UK is under trials for e-scooter laws, there are still many people who buy e-scooters to ride on their private property or to take part in the trial runs. For these people we at scooter guys provide the best e scooter repair London city has to offer. You can order any spare part online from our shop and get it installed at our service shop. We have experts who have license to fix on warranty policy as well.

Repair from Distributor

If you run into the trouble of a scooter breakdown, then we a t scooter guys are here to help you with the repairs in case we are the distributors you bought your electric scooter from. We at Scooter guys will always be available for your urgent needs. Our mechanics are top notch and handle all the repairs professionally.

Repair Shops

it is necessary to diagnose a malfunction on an electric scooter, and with very little knowledge and with the use of Google many search for the most common of question with the electric scoter name, for example, Xiaomi electric scooter repair near me. And the answer will always be the nearest repair shop location and if you live in the London, Bradford area, our repair shop will pop up on you search.

Maintenance Site

Maintaining an electric scooter is very important, both for your safety and for the scooter itself. You need to take care of it and maintain it properly so that you have as few breakdowns on it as possible. Many people ask about, electric scooter maintenance near me, but you can also do the maintenance yourself, by following the instructions provided on scooter guys website.

Electric scooters break down from time to time and it is common occurrence that after a lot of miles you need to replace a part or fix something before you can use it again. . We at scooter guys also advice on the fact that regular maintenance is also essential to make your electric scooter last as long as possible. I hope we helped you and if you have any additional questions feel free to contact us on our scooter guys website.

https://scooterguys.co.uk/

https://www.google.com/search?client=firefox-b-d&q=scooter+guys+bradford+


Read more

Do I Need to Wear a Helmet When Riding an Electric Scooter?

Do I Need to Wear a Helmet When Riding an Electric Scooter?

Helmets are an item of protective gear worn around one’s head for the purpose of protecting the head from any injury and damaging the brain and skull. The newest electric scooters are made to maintain a fast speed.  The electric scooters are testes to exceed the speed 40MPH(60kmh). Combined with dangers such as road hazards, motor vehicles, and small tires, a helmet is a necessity when riding on an electric scooter.

Not all helmets are created appropriate nor are all equal for electric scooters. Even though governing bodies have not established a formal law or standard for the use of electric scooters, the general understanding among the riders is that a quality helmet is appropriate for low speed riding, while a motorcycle or bike  while  helmet is required for higher speeds.

Is a Helmet Required on an Electric Scooter?

Yes, a helmet is absolutely required while riding an electric scooter.  An electric scooter helmet can be bought form the scooter guys online shop, the best electric scooter accessories UK has seen so far, are available at our online shop. even budget Electric scooters allow a ride at your maximum speed most of the time. Most electric scooters will have the limit at 15mph and many exceed the speed limit of 30mph.  Accidents and falls can occur at any time and cause damage, therefore wearing helmets is required for your own safety.

You should most certainly double-check what position your local regulator has on electric scooters and find out whether helmets are compulsory, we believe that you should always wear a helmet, even if it is not compulsory in your country. Helmets protects your skull and brain which are the most important parts of your body.

Varying Helmet Laws:

Sometimes wearing helmets depends on where you are riding the electric scooter. There are many states or countries where electric scooters are legal and, you are allowed to ride an e-scooter without a helmet, but some counties have specific safety laws and require every rider to wear a helmet, regardless of their age. Whenever you want a comprehensive guide describing international e-scooter laws, keep your eyes out for our blogs as we will certainly be providing you with the necessary information.

Helmet Safety:

While in some areas in the world, riding your e-scooter without a helmet might be legal and wearing a helmet is entirely up to you.  But the question stands, is riding without a helmet safe? And the answer is a simple one, if you enjoy the thrill of speeding on an electric scooter, then you need to wear a helmet for your own safety. But if you ride in private areas and under the speed limit then you do not need a helmet. Prevention of mishaps is the key to wearing a helmet. Helmets can reduce the risk of brain and head injury dramatically by a 50% and they guarantee a safer riding experience.

It is always better to be safe than being fashionable and sporting an injury. And if you have a rental scooter which does not come with a helmet and a compartment to carry the helmet, then we at scooter guys provide the best e scooter parts and accessories to those who have rental e-scooters.

So there you have it, we hope that this article was helpful in making you decide what to do to about your helmet dilemma in the future. But remember that your safety should always be your number one priority despite wanting to have fun.

https://scooterguys.co.uk/

https://www.google.com/search?client=firefox-b-d&q=scooter+guys+bradford+

Read more